分类目录归档:linux

nginx 升级后访问400 BAD REQUEST增多的问题

一些旧设备访问nginx的时候可能会出现400 bad request, 这个跟2020.2月nginx移除了一个兼容特性有关

Disabled duplicate “Host” headers (ticket #1724). Duplicate “Host” headers were allowed in nginx 0.7.0 (revision b9de93d804ea) as a workaround for some broken Motorola phones which used to generate requests with two “Host” headers[1]. It is believed that this workaround is no longer relevant.

新增的这块代码如下: 会判断是否有重复的host 头, 而在之前的版本是认为可以容忍的

这个兼容特性被移除后, 会导致一些旧版本的移动设备响应异常

而我们线上测试机器主要是兼容了spdy协议, 也出现了400 BAD REQUEST, 这个跟spdy代码里边本身进行了一遍header处理有关:

可以参考:

https://hg.nginx.org/nginx/rev/4f18393a1d51

http://mailman.nginx.org/pipermail/nginx-devel/2020-February/012999.html

编译chromium的一些记录

这两个命令用来编译release版本的二进制文件

gn gen out/release –args=”is_component_build=false is_debug=false”

ninja -C out/release nginx-1.18.0_ipdb

默认系统头文件和依赖库

build/linux/debian_sid_amd64-sysroot 这个目录相当于根目录, usr/lib和usr/include 分别放了依赖库和头文件

chromium移除了这两个文件,不知道为何, 会导致nginx 编译失败,目前解决办法是从旧版本拷贝过去

build/linux/debian_sid_amd64-sysroot/usr/lib/x86_64-linux-gnu/libcrypt.so

build/linux/debian_sid_amd64-sysroot/usr/include/crypt.h

修改编译参数

build/config/compiler/BUILD.gn, 比如nginx 可能需要把这个特性关掉

if (!is_nacl && !use_libfuzzer) {
#cflags += [ “-Wunreachable-code” ]
}

编译方式

executable(“fssnginx-1.18.0_ipdb”) {
sources = [
“/root/fssnginx/nginx-1.18.0/objs/ngx_modules.c”,
“/root/fssnginx/nginx-1.18.0/src/core/nginx.c”,

….

]

include_dirs = [
“/root/fssnginx/nginx-1.18.0/src/core”,
“/root/fssnginx/nginx-1.18.0/src/event”,
“/root/fssnginx/nginx-1.18.0/src/event/modules”,
“/root/fssnginx/nginx-1.18.0/src/os/unix”,
“/root/fssnginx/nginx-1.18.0/nginx_upstream_check_module-master”,
“/root/fssnginx/nginx-1.18.0/ngx_devel_kit-0.3.0/objs”,
“/root/fssnginx/nginx-1.18.0/objs/addon/ndk”,
“/root/fssnginx/nginx-1.18.0/lua-nginx-module-0.10.13/src/api”,
“/root/fssnginx/nginx-1.18.0/pcre-8.42”,
“/root/fssnginx/nginx-1.18.0/zlib-1.2.11”,
“/root/fssnginx/nginx-1.18.0/objs”,
“/root/fssnginx/nginx-1.18.0/src/http”,
“/root/fssnginx/nginx-1.18.0/src/http/modules”,
“/root/fssnginx/nginx-1.18.0/src/http/v2”,
“/root/fssnginx/nginx-1.18.0/src/http”,
“/root/fssnginx/nginx-1.18.0/ngx_devel_kit-0.3.0/src”,
“/root/fssnginx/nginx-1.18.0/ngx_devel_kit-0.3.0/objs”,
“/root/fssnginx/nginx-1.18.0/objs/addon/ndk”,
“/root/fssnginx/nginx-1.18.0/luajit/include/luajit-2.0”,
“/root/fssnginx/nginx-1.18.0/quic_module/chromium”,
]
deps = [
“:epoll_quic_tools”,
“:epoll_server”,
“:net”,
“:simple_quic_tools”,
“//base”,
“//third_party/boringssl”,
]
lib_dirs = [
“/root/fssnginx/nginx-1.18.0/json-c/lib”,
“/root/fssnginx/nginx-1.18.0/luajit/lib”,
]
libs = [
“/root/fssnginx/nginx-1.18.0/pcre-8.42/.libs/libpcre.a”,
“/root/fssnginx/nginx-1.18.0/zlib-1.2.11/libz.a”,
“luajit-5.1”,
“json-c”,
“crypt”,
]
cflags_c = [
“-D_FORTIFY_SOURCE=2”,
“-DTCP_FASTOPEN=23”,
“-DNDK_SET_VAR”,
]
}

nginx resolver 和 /etc/resolv.conf 以及AAAA ipv6的关系

Syntax:resolver address ... [valid=time] [ipv6=on|off];
Default:
Context:httpserverlocation
http://nginx.org/en/docs/http/ngx_http_core_module.html#resolver

我们都知道nginx 有个resolver 能提供NS解析的功能,那么什么时候用系统自带配置,什么时候用resolver呢? 这里直接给结论:

 proxy_pass 给一个域名, 用系统自带的resolv.conf

server {

    listen 80 ;

    server_name www.4os.org;

    resolver 114.114.114.114 ipv6=off;

    location / {

        proxy_pass http://www.qq.com;

    }

}

upstream server 里边跟域名, 用系统自带的resolv.conf

upstream backends {

    server www.qq.com;

}

server {

    listen 80 ;

    server_name www.sohu.com;

    resolver 114.114.114.114 ipv6=off;

    location / {

        proxy_pass http:// backends;

    }

}

 proxy_pass 后边跟的是变量,比如你设置的$host, 用resolver

server {

    listen 80 ;

    server_name www.4os.org;

    resolver 114.114.114.114 ipv6=off;

    location / {

        set $ups “www.qq.com”;

        proxy_pass http://$ups;

    }

}

 另外 nginx plus版本, upstream server 的域名如果带了resolver 参数,那么用resolver

resolver 10.0.0.2 valid=10s;

upstream backends {
    zone backends 64k;
    server backends.example.com:8080 resolve;
}

server {
    location / {
        proxy_pass http://backends;
    }
}

至于AAAA的IPV6结果,如果是用系统自带的解析器,那么nginx 会ipv4和ipv6一起解析, 如果你的nginx服务器没有V6地址,这会产生额外的一个upstream error,并next_upstream给V4地址

所以,如果要禁用V6解析, 你需要使用变量设置你的proxy_pass 回源,并明确定义resolver 的ipv6=off参数

以上结论基于nginx官方文档,并使用tcpdump监测dns解析获得

参考文档: https://www.nginx.com/blog/dns-service-discovery-nginx-plus/#domain-name-proxy_pass

谈谈 XOPEN_SOURCE

最近维护一个古老代码的时候,在AS7里边编译的时候出现了不少错误,比如:

warning: comparison between pointer and integer, 这是代码 strptime(current_time, “%a%n%b%n%d%n%H:%M:%S%n%Y”, &tm) == NULL) 产生的

还有, warning: incompatible implicit declaration of built-in function ‘snprintf’, 这是类似 snprintf(path, sizeof(path), “%s/arc_%s”, archdir, com->cat) 的代码产生的

查了下,strptime的异常返回值确实是NULL, http://man7.org/linux/man-pages/man3/strptime.3.html

If strptime() fails to match all of the format string and therefore an error occurred, the function returns NULL.

一般来说, 类似的snprintf错误 添加 #include<stdlib.h>就好,但是这个古老代码里边已经有这个了

在代码的开头发现了这个东西

define _XOPEN_SOURCE

       _XOPEN_SOURCE
              Defining this macro causes header files to expose definitions as
              follows:

              o  Defining  with  any  value  exposes definitions conforming to POSIX.1, POSIX.2, and XPG4.

              o  The value 500 or greater additionally exposes definitions for SUSv2 (UNIX 98).

              o  (Since  glibc  2.2)  The  value  600  or greater additionally exposes  definitions  for   SUSv3   (UNIX   03;   i.e.,   the POSIX.1-2001  base  specification plus the XSI extension) and C99 definitions.

              o  (Since glibc 2.10) The  value  700  or  greater  additionally exposes  definitions  for  SUSv4 (i.e., the POSIX.1-2008 base specification plus the XSI extension).

https://linux.cn/man7/feature_test_macros.7.html, 初略的说,大概是不同的值会影响某些函数和库的一些标准行为,而默认的_xopen_soure 不带参数会被认为是<500

#define _XOPEN_SOURCE        /* or any value < 500 */

所以需要修正这个模式,添加一个标准即可,由于代码比较古老,修改为500和600都可以编译通过

nginx 与 TLS1.3

TLS1.3支持了更优秀的SSL 新特性,可以有效降低https的协商时间,建议升级

本文使用了最新的nginx 1.14.1 (该版本修正了 1.14 H2 cpu/mem 攻击漏洞: low)

#wget https://www.openssl.org/source/openssl-1.1.1.tar.gz
#wget http://nginx.org/download/nginx-1.14.1.tar.gz

#spdy兼容补丁
#wget https://raw.githubusercontent.com/favortel/nginx_patch/master/nginx-1.14.0_spdy_h2.patch

#OKHTTP H2 头部动态压缩兼容补丁
#wget https://raw.githubusercontent.com/favortel/nginx_patch/master/fssnginx_1.14.0_dynamic_table_size.patch

#PCRE ZLIB等
#wget https://ftp.pcre.org/pub/pcre/pcre-8.42.tar.gz
#wget https://zlib.net/zlib-1.2.11.tar.gz

#tar -zxvf openssl-1.1.1.tar.gz
#tar -zxvf pcre-8.42.tar.gz
#tar -zxvf zlib-1.2.11.tar.gz
#tar -zxvf nginx-1.14.1.tar.gz

#cd nginx-1.14.1
#patch -p1 < ../fssnginx_1.14.0_dynamic_table_size.patch
#patch -p1 < ../nginx-1.14.0_spdy_h2.patch

./configure --prefix=/opt/itc/nginx --with-http_stub_status_module --with-http_realip_module --with-http_ssl_module --with-openssl=../openssl-1.1.1 --with-pcre=../pcre-8.42 --with-pcre-jit --with-zlib=../zlib-1.2.11 --with-http_v2_module --with-http_spdy_module
#make && make install

配置比较简单,就是ssl_protocols 增加TLSv1.3就好, ssl_ciphers 不用特意改动:

...
ssl_protocols               TLSv1 TLSv1.1 TLSv1.2 TLSv1.3;
ssl_ciphers                 ECDHE-RSA-AES128-GCM-SHA256:ECDHE-ECDSA-AES128-GCM-SHA256;
ssl_prefer_server_ciphers   on;
ssl_ecdh_curve              secp384r1;
...

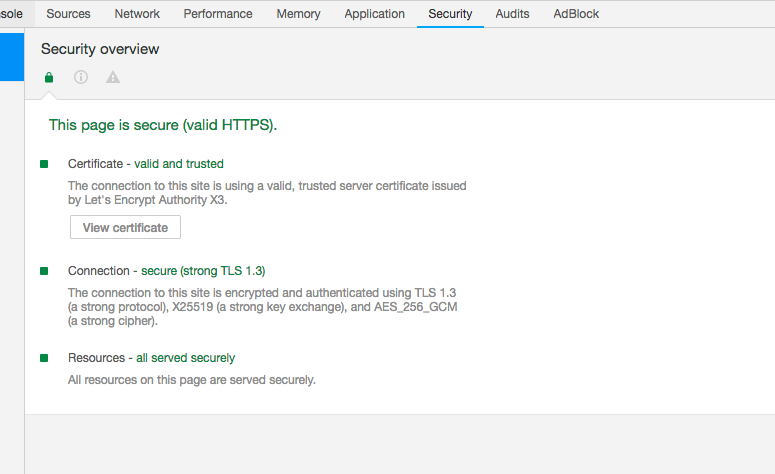
比如本站,如果您是用chrome访问的是https协议,打开开发者工具-security,就能看到本站使用了TLS1.3了

apache 配置指令执行顺序

需要特别留意下,apache的配置是有顺序关系的,以下为先后:

  1. <Directory> (except regular expressions) and .htaccess done simultaneously (with .htaccess, if allowed, overriding <Directory>)
  2. <DirectoryMatch> (and <Directory ~>)
  3. <Files> and <FilesMatch> done simultaneously
  4. <Location> and <LocationMatch> done simultaneously

举个例子,执行顺序是 A > B > C > D > E

<Location />
E
</Location>

<Files f.html>
D
</Files>

<VirtualHost *>
<Directory /a/b>
B
</Directory>
</VirtualHost>

<DirectoryMatch “^.*b/”>
C
</DirectoryMatch>

<Directory /a/b>
A
</Directory>


一个危险的示例,在这个例子里边,其实deny 不生效,因为被后生效的 location 配置覆盖了

<Location />
Order deny,allow
Allow from all
</Location>

# Woops! This <Directory> section will have no effect
<Directory />
Order allow,deny
Allow from all
Deny from badguy.example.com
</Directory>

参考文档: http://www.who.int/manual/sections.html#mergin

nginx 1.14 与 okhttp H2不兼容的情况

新上线 nginx 1.14的时候,发现 许多使用okhttp的APP通讯异常了, 听包能发现服务器返回的很多小包被认为是非法数据忽略了

查了下nginx 官方资料,发现这是一个H2 动态压缩导致的不兼容情况, 需要使用补丁去绕开这个问题

问题的关键看起来是OKHTTP 库无法支持H2协议里边头部压缩的一个标准特性:  ​Dynamic Table Size 更新,导致了客户端和服务端协商失败

测试证明nginx 1.13.6 引入了这个特性并会导致okhttp3.4.1版本(我测试的版本)H2通讯异常, 可以通过以下链接获取到这些信息,应用这个补丁可以解决这个问题

https://trac.nginx.org/nginx/changeset/fbb683496705f91db4dad32b3ec2ec4ed75115c0/nginx

https://trac.nginx.org/nginx/ticket/1397

另外,在1.15.3版本,修正了这个问题,但是1.14序列没有同步跟进

postfix 内网发信

一般来说我们的linux服务器有内网发信的权限就可以了,所以需要对postfix进行简单的配置
修改 vim /etc/postfix/main.cf

myhostname = lookgod.sohu.com
mynetworks = 127.0.0.0/8
relayhost = transport_server_ip

顺便修改下 inet_protocols = ipv4 以免ipv6报错

就可以了

ssh 的一些小技巧

1. 通常批量处理的时候会遇到ip down的问题,会等待非常久,可以加个超时
ssh -o ConnectTimeout=3

2. 如果要在远端机器使用变量怎么办? 因为变量会在本地机器被默认解析, 比如awk的$1, 所以可以加个反斜杠\
ssh -o ConnectTimeout=3 $IP " cat filelist |awk '{print \$1}' "

3. 如果要把远端运行结果赋值给某个变量怎么办?,因为执行的命令也会在本地机器被默认解析,所以也需要加个反斜杠\
ssh $IP “df_data= \`df\`; echo \$df_data ”

4. 另外,如果是逐个IP批处理,很容易遇到执行一个就退出的情况,需要加个n
ssh -n $IP

rp_filter 在rhel6 和 rhel7 之后的一些改变

rp_filter, reverse-path filtering,反向过滤技术,系统在接收到一个IP包后,检查该IP是不是合乎要求,不合要求的IP包会被系统丢弃。该技术就称为rp filter。怎么样的包才算不合要求呢?例如,用户在A网口上收到一个IP包,检查其IP为B。然后考查:对于B这个IP,在发送时应该用哪个网口,“如果在不应该接收到该包的网口上接收到该IP包,则认为该IP包是hacker行为”。

例如:

A: 192.168.8.100

B: (IGMP Query) 10.0.0.1 来自路由器

查找路由表

网卡1为默认路由: 172.17.5.100 172.17.5.1

网卡2 192.168.8.100 192.168.8.1

系统根据路由表,认为10.0.0.1这个IP应该在第一个网卡172.17.5.100上收到,现实的情况是在第二张网卡192.168.8.100上收到了。认为这是不合理的,丢弃该包。致命的问题的,该包是来自路由器的IGMP Query包。

The rp_filter can reject incoming packets if their source address doesn’t match the network interface that they’re arriving on, which helps to prevent IP spoofing. Turning this on, however, has its consequences: If your host has several IP addresses on different interfaces, or if your single interface has multiple IP addresses on it, you’ll find that your kernel may end up rejecting valid traffic. It’s also important to note that even if you do not enable the rp_filter, protection against broadcast spoofing is always on. Also, the protection it provides is only against spoofed internal addresses; external addresses can still be spoofed.. By default, it is disabled.

rp_filter参数在升级到RHEL6之后的版本后出现了比较大的改变,我们看下内核参数解析

在RHEL5的时候这个内核参数的含义:


/usr/share/doc/kernel-doc-2.6.18/Documentation/networking/ip-sysctl.txt

rp_filter - BOOLEAN
        1 - do source validation by reversed path, as specified in RFC1812
            Recommended option for single homed hosts and stub network
            routers. Could cause troubles for complicated (not loop free)
            networks running a slow unreliable protocol (sort of RIP),
            or using static routes.

        0 - No source validation.

        conf/all/rp_filter must also be set to TRUE to do source validation
        on the interface

        Default value is 0. Note that some distributions enable it
        in startup scripts.

在RHEL6 RHEL7之后这个内核参数的含义:


/usr/share/doc/kernel-doc-2.6.32/Documentation/networking/ip-sysctl.txt

rp_filter - INTEGER
        0 - No source validation.
        1 - Strict mode as defined in RFC3704 Strict Reverse Path 
            Each incoming packet is tested against the FIB and if the interface
            is not the best reverse path the packet check will fail.
            By default failed packets are discarded.
        2 - Loose mode as defined in RFC3704 Loose Reverse Path 
            Each incoming packet's source address is also tested against the FIB
            and if the source address is not reachable via any interface
            the packet check will fail.

        Current recommended practice in RFC3704 is to enable strict mode 
        to prevent IP spoofing from DDos attacks. If using asymmetric routing
        or other complicated routing, then loose mode is recommended.

        The max value from conf/{all,interface}/rp_filter is used 
        when doing source validation on the {interface}.

        Default value is 0. Note that some distributions enable it
        in startup scripts.

所以如果需要和RHEL5的行为保持一致,应该设置


net.ipv4.conf.default.rp_filter = 2
net.ipv4.conf.all.rp_filter = 2

否则在多IP/多网卡/多网段的时候,会出现非预期的丢弃数据包的问题
具体可以参考:
redhat 官方文档: https://access.redhat.com/solutions/53031
案例分析: http://www.cnblogs.com/huazi/archive/2013/02/25/2932021.html