分类目录归档:技术

BCM5709 bnx2.0.2驱动 故障问题

RHEL5.5自带的BNX2.0.2跟intel的BCM5709存在兼容性问题

今天有两台发现应用性能监控曲线波动非常厉害,手工测试也发现间中无响应

检查eth1发现rx_fw_discards 数据特别高且在不断增加

# ethtool  -S eth1 | grep rx_fw_discards

rx_fw_discards: 4250136

驱动版本是2.0.2,这个版本在其他节点出现过问题,建议降级到稳定版本或者先增大rx

# ethtool -i eth1

driver: bnx2

version: 2.0.2

刚好有朋友困扰这个问题,放出稳定版驱动和降级办法:

驱动下载: http://www.4os.org/video/other/bnx2.tar.gz

脚本:

cd netxtreme2-5.0.17/bnx2-1.9.20b/src/;

make; make install;

ifconfig eth0 down; ifconfig eth1 down; ifconfig eth2 down;

rmmod bnx2; modprobe bnx2;

service network restart;

请务必使用一个脚本来执行,否则ssh中断又没远程管理就只能重启了

nginx 视频服务器 架设

1.web服务器选用,建议使用0.8的稳定版

2.nginx默认自带了flv解码,编译的时候加上参数–with-http_flv_module即可

3.比较流行的mp4编码,需要另外安装第三方模块,建议使用http://h264.code-shop.com的H246方案

这个模块最新版本是2.3.2(不是官网介绍的2.2.7),并且需要打patch fix两个bug

1)zero_in_uri在0.8系列取消

2)404  错误返回415

模块可以从 http://h264.code-shop.com/download/nginx_mod_h264_streaming-2.3.2.tar.gz 下载

补丁可以从   http://www.4os.org/video/nginx/h246_stream_2.3.2.patch 下载

(不建议使用2.2.7版本,该版本有fclose空指针漏洞,并根据迅雷给我的反馈看存在编码兼容性造成的高负载问题)

4. 编译参数,简单示例下:

./configure –with-http_flv_module  –add-module=/path_to/nginx_mod_h264_streaming-2.3.2

如果不想自己patch,这里有patch好的模块,一样可用:

h264_stream_2.3.2.tar.gz

5.防盗链/限速/IO优化等,将在后续详细讲解:

1)防盗链:防盗链分为简单的refer引用判断和较为复杂的动态链接两种(比如时间/文件名双因子加密)

2)限速:nginx天然的支持了限速,limit-rate参数不仅仅能让视频流平滑的输出,还能极大的缓解IO压力

3)IO优化:包括内核调整/磁盘raid设置/使用SSD设备,在具备优秀开发人员的情况下甚至可以打散磁盘放置多份热点等

any question,mail to favortel#qq.com

Nginx启动初始化过程(转载)

main函数做的第一件事情就是对参数选项进行处理,和普通的Linux程序如出一辙,如下:

if (ngx_get_options(argc, argv) != NGX_OK) { return 1; }

Nginx用此函数对参数选项进行解析,从而采取相应的动作,比如:显示版本、测试配置等功能。其实此函数实现的很简陋,远没有Linux提供的getopt()那么强悍,但却可以达到跨平台的目的。

     ngx_time_init();
#if (NGX_PCRE)
    ngx_regex_init();
#endif
    ngx_pid = ngx_getpid();
    log = ngx_log_init(ngx_prefix);
    if (log == NULL) {
        return 1;
    }

上述几行代码的功能如其名,主要完成Nginx在时间和日志等方面的初始化工作。

    if (ngx_save_argv(&init_cycle, argc, argv) != NGX_OK){
        return 1;
    }

将命令行参数保存到ngx_os_argv、ngx_argc以及ngx_argv这几个全局的变量中。这算是一个备份存储,方便以后master进程做热代码替换之用。

     if (ngx_os_init(log) != NGX_OK) {
        return 1;
    }

完成操作系统的一些信息获取,如内存页面大小、系统限制资源等信息;所有的这些资源都将会被保存在对应的全局变量中,因此后续访问将会很便利。

    if (ngx_crc32_table_init() != NGX_OK) {
        return 1;
    }

初始化一个做循环冗余校验的表,由此可以看出后续的循环冗余校验将采用高效的查表法。crc算法此处就不做分析,网上一堆一堆的相关资料,有兴趣的同学可以了解。

    if (ngx_add_inherited_sockets(&init_cycle) != NGX_OK) {
        return 1;
    }

通过环境变量NGINX完成socket的继承,继承来的socket将会放到init_cycle的listening数组中。在NGINX环境变量中,每个socket中间用冒号或分号隔开。完成继承同时设置全局变量ngx_inherited为1。

    ngx_max_module = 0;
    for (i = 0; ngx_modules[i]; i++) {
        ngx_modules[i]->index = ngx_max_module++;
    }

额!!!这个循环中的ngx_modules数组好像没见定义,难不成是火星来的?当然不是,如其名,这就是一个存储所有模块的信息,包括自己开发的模块都会放到这个数组中,而这个神秘的数组却是在自动编译的时候生成的,位于objs/ngx_modules.c文件中。这个循环的目的是清晰可见的——对所有模块进行索引编号,方便以后访问;同时借助ngx_max_module对所有模块进行了一次点数,确定究竟有多少模块。而神秘数组ngx_modules的长相大概如下:

ngx_module_t *ngx_modules[] = {
    &ngx_core_module,
    &ngx_errlog_module,
    &ngx_conf_module,
    &ngx_events_module,
    &ngx_event_core_module,
    &ngx_epoll_module,
    &ngx_openssl_module,
    &ngx_http_module,
    。。。
};
    cycle = ngx_init_cycle(&init_cycle);

这里将会初始化很多的东东到全局变量cycle中,是Nginx启动初始化的核心之处。ngx_init_cycle函数的过程比较多,放下一篇blog中逐段分析。

    if (ngx_init_signals(cycle->log) != NGX_OK) {
        return 1;
    }

注册一堆信号处理程序,需要注册的信号及相应的信号处理函数被放在一个类型为ngx_signal_t的数组signals中。数组定义在src/os/unix/ngx_process.c中。ngx_signal_t结构类型定义了信号值,信号名字,信号对应动作名以及信号处理函数。

     if (!ngx_inherited && ccf->daemon) {
        if (ngx_daemon(cycle->log) != NGX_OK) {
            return 1;
        }
        ngx_daemonized = 1;
    }

ngx_daemon肯定就是用来实现守护进程的函数了,此处就不多废话了,有需要写server程序的,可以直接copy这段代码实现守护进程。

    if (ngx_create_pidfile(&ccf->pid, cycle->log) != NGX_OK) {
        return 1;
    }

玩过Nginx的人都知道,Nginx启动后有一个记录进程id的文件,这个文件里面就一个pid。原来这个pid就是在这个地方记录下来的。查看ngx_create_pidfile函数可以看到这样的一行代码

if (ngx_process > NGX_PROCESS_MASTER) {
return NGX_OK;
},这行代码就说明了,不是master进程时,就不创建这样的一个pid文件。

    if (ngx_process == NGX_PROCESS_SINGLE) {
        ngx_single_process_cycle(cycle);
    } else {
        ngx_master_process_cycle(cycle);
    }

到此就基本完成Nginx的启动初始化过程了,即将开始进程相关的工作了,这里最重要的ngx_master_process_cycle这个过程,在这个过程里实现了master-worker模式的进程模型,也是生成环境下Nginx的常用模型。既然此处已不再是初始化工作,那么就留到后续分析吧。

上述所有过程都是在main函数里完成的,下一篇分析ngx_init_cycle函数。

From: http://www.tbdata.org/archives/1092

Adobe FMS Open File

这边有个需求是替换adobe fms 热点文件的时候防止删除正在访问的文件,保证用户请求不中断

但是发现adobe fms open的文件lsof看不到,但是iostat能证实该磁盘是在读取的,很奇怪

尝试用inotify去捕捉事件,可以发现:

[@dg_80_65 inotify-tools-3.14]# inotifywait -m  \
 --timefmt  '%d/%m/%y %H:%M' --format  '%T %e %w%f'  \
/data/video/ssdcached/stream/20100525/57d4f5a6-fc8d-4f8f-b0f7-c00020f6c7ac.mp4
Setting up watches.
Watches established.
01/11/10 18:37 OPEN /data/video/ssdcached/stream/20100525/57d4f5a6-fc8d-4f8f-b0f7-c00020f6c7ac.mp4
01/11/10 18:37 ACCESS /data/video/ssdcached/stream/20100525/57d4f5a6-fc8d-4f8f-b0f7-c00020f6c7ac.mp4
01/11/10 18:37 CLOSE_NOWRITE,CLOSE /data/video/ssdcached/stream/20100525/57d4f5a6-fc8d-4f8f-b0f7-c00020f6c7ac.mp4
01/11/10 18:38 OPEN /data/video/ssdcached/stream/20100525/57d4f5a6-fc8d-4f8f-b0f7-c00020f6c7ac.mp4
01/11/10 18:38 ACCESS /data/video/ssdcached/stream/20100525/57d4f5a6-fc8d-4f8f-b0f7-c00020f6c7ac.mp4
01/11/10 18:38 CLOSE_NOWRITE,CLOSE /data/video/ssdcached/stream/20100525/57d4f5a6-fc8d-4f8f-b0f7-c00020f6c7ac.mp4

所有文件迅速的打开,读取,关闭,所以lsof捕捉不到

adobe的文档是这么说的:

When a stream is requested from the server, segments of the stream are stored in a cache on the server. As long as the cache has not reached capacity, the server places segments in the cache. Each time a stream attempts to access a segment, the server checks the cache. If the segment is available, the server gives the stream a reference to the segment for playback. If the segment is not available, the server retrieves the segment from its source, inserts it into the cache, and returns a reference to that segment to the stream.
When the cache is full, the server removes unused segments, starting with the least recently used. After removing all unused segments, if there still isn’t enough room for a new segment, the server notifies the client that the stream is not available and makes an entry in the core log file.

大意是说fms是从缓存区取文件的,如果不存在该文件的这一部分,就会从源文件读取,放入缓存区,再给用户

因此,比较可以接受的办法是删除文件之前判断下access time的时间戳

stat -c %X /data/video/ssdcached/stream/20100525/57d4f5a6-fc8d-4f8f-b0f7-c00020f6c7ac.mp4

双网卡bond 配置

最近公司的服务器配置做了更改,LVS+双公网策略路由出了问题,所以干脆改成bonding来做

bonding的各种模式:

按照卢瑟同学的介绍,bonding有7种模式:

Mode=0(balance-rr) 表示负载分担round-robin,和交换机的聚合强制不协商的方式配合。
Mode=1(active-backup) 表示主备模式,只有一块网卡是active,另外一块是备的standby
这时如果交换机配的是捆绑,将不能正常工作,因为交换机往两块网卡发包,有一半包是丢弃的。
Mode=2(balance-xor) 表示XOR Hash负载分担,和交换机的聚合强制不协商方式配合。(需要xmit_hash_policy)
Mode=3(broadcast) 表示所有包从所有interface发出,这个不均衡,只有冗余机制...和交换机的聚合强制不协商方式配合。
Mode=4(802.3ad) 表示支持802.3ad协议,和交换机的聚合LACP方式配合(需要xmit_hash_policy)
Mode=5(balance-tlb) 是根据每个slave的负载情况选择slave进行发送,接收时使用当前轮到的slave
Mode=6(balance-alb) 在5的tlb基础上增加了rlb。
5和6不需要交换机端的设置,网卡能自动聚合。4需要支持802.3ad。0,2和3理论上需要静态聚合方式
但实测中0可以通过mac地址欺骗的方式在交换机不设置的情况下不太均衡地进行接收。

决定使用最简单的模式6来做

bonding的配置

modprobe.conf

在这个文件加入

alias bond0 bonding
options bond0 miimon=100 mode=5

网卡配置文件修改

ifcfg-eth1

DEVICE=eth1
USERCTL=no
ONBOOT=yes
MASTER=bond0
SLAVE=yes
BOOTPROTO=none

ifcfg-eth2

DEVICE=eth2
USERCTL=no
ONBOOT=yes
MASTER=bond0
SLAVE=yes
BOOTPROTO=none

ifcfg-bond0

DEVICE=bond0
IPADDR="Your IP Adress"
NETMASK="Your NetMask"
ONBOOT=yes
BOOTPROTO=none
USERCTL=no

变更修改

/etc/init.d/network stop;modprobe -r bonding;/etc/init.d/network start

附录:转发方式

layer2 (1): (source MAC XOR destination MAC) modulo slave count
layer2+3 (2): (((source IP XOR dest IP) AND 0xffff) XOR ( source MAC XOR destination MAC )) modulo slave count
layer3+4 (3): ((source port XOR dest port) XOR ((source IP XOR dest IP) AND 0xffff) modulo slave count
为了能更加均衡,可采用 mac ip 异或 哈希:xmit_hash_policy=2

Dell Drac6 虚拟介质安装系统

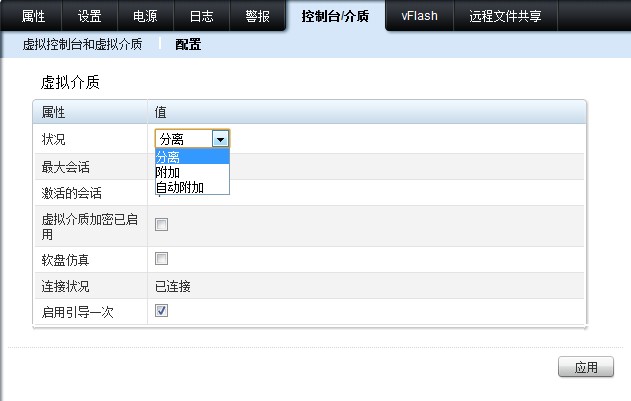
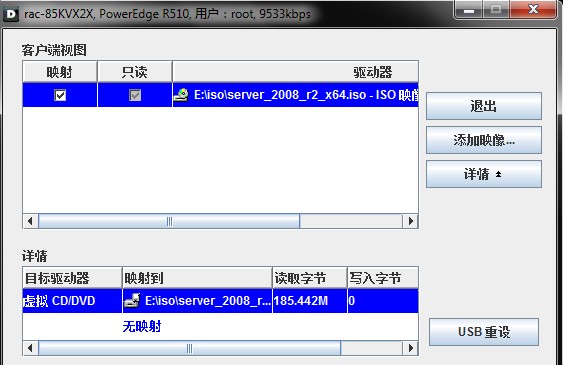
换了Dell的R510服务器,联通远程管理器后发现虚拟介质无法映射,一直提示“虚拟介质分离或所选虚拟磁盘驱动器的虚拟介质重定向已由另一用户使用”

一番折腾后找到解决办法:

1.在管理界面-控制台/介质-虚拟介质:设置附加或者自动附加

2.这个时候应该可以附加iso了

3.在控制台”设置-第一个引导设备”选择虚拟介质,然后重启机器就可以从iso引导系统安装了

wordpress 替换搜索框

决定把搜索框替换成google的自定义搜索

找到wp-includes/general-template.php的第160行

$form = ‘<form role=”search” method=”get” id=”searchform” action=”‘ . home_url( ‘/’ ) . ‘” >
<div><label for=”s”>’ . __(‘Search for:’) . ‘</label>
<input type=”text” value=”‘ . get_search_query() . ‘” name=”s” id=”s” />
<input type=”submit” id=”searchsubmit” value=”‘. esc_attr__(‘Search’) .'” />
</div>
</form>’;
替换成google的ADSense代码即可

linux访问mssql server

使用freetds可以方便的管理微软的SQLSERVER2000 2005
目前的需求是需要监控一台windowns的数据库,非常不稳定
本来想用php+freetds的,后来发现它本身的bin工具就非常强大了,可以直接执行sql语句
加上简单的脚本就可以很好的完成监控任务

关于somaxconn参数

我们线上服务器net.core.somaxconn都是默认的128,这个参数会影响到所有AF_INET类型socket的listen队列

Man 2 listen可以知道:

int listen(int s, int backlog);

The  backlog  parameter  defines the maximum length the queue of pending connections may grow to.  If a connection request

arrives with the queue full the client may receive an error with an indication of ECONNREFUSED or, if the underlying  pro-

tocol supports retransmission, the request may be ignored so that retries succeed.

BUGS

If the socket is of type AF_INET, and the backlog argument is greater than the constant SOMAXCONN  (128  in  Linux  2.0  &

2.2),  it  is silently truncated to SOMAXCONN.

也就是说,web应用中listen函数的backlog会给我们内核参数的net.core.somaxconn 限制到128,在高突发的请求中可能会导致链接超时或者触发重传

比如nginx 定义NGX_LISTEN_BACKLOG默认到511, 却由于我们参数未曾优化会限制到128,只有128个connections can be queued in kernel listen
queue(by Igor Sysoev).

#define NGX_LISTEN_BACKLOG 511/ls.backlog = NGX_LISTEN_BACKLOG;/ if (listen(s, ls.backlog) == -1) {

相信其他应用比如squid也会有类似问题,突发的大并发connect请求会由于内核listen队列的限制导致链接超时或者重传,从而影响用户体验

以下是实验测试情况,使用2台机器分别以1000个并发,benchmark方式,请求服务器 ( 相当于2000个并发请求同时请求服务器 )

情景1,默认配置, net.core.somaxconn=128,服务器为nginx

测试客户端A:

Transactions:                2072870 hits

Availability:                  99.99 %

Elapsed time:                 179.59 secs

Data transferred:            6096.59 MB

Response time:                  0.08 secs

Transaction rate:           11542.24 trans/sec

Throughput:                    33.95 MB/sec

Concurrency:                  927.34

Successful transactions:     2072871

Failed transactions:             300

Longest transaction:           45.30

Shortest transaction:           0.00

错误率大概是1.5%

测试客户端B:

Transactions:                1859454 hits

Availability:                  99.99 %

Elapsed time:                 179.11 secs

Data transferred:            5468.90 MB

Response time:                  0.09 secs

Transaction rate:           10381.63 trans/sec

Throughput:                    30.53 MB/sec

Concurrency:                  904.45

Successful transactions:     1859454

Failed transactions:             276

Longest transaction:           49.60

Shortest transaction:           0.00

错误率大概也是1.5%

错误提示大都为:

socket: connection timed out

warning: socket: -1803417280 select timed out: Connection timed out

情景2,调整配置, net.core.somaxconn=8192,  nginx显式配置  listen     80 default backlog=8192;

测试客户端A:

** SIEGE 2.69

** Preparing 1000 concurrent users for battle.

The server is now under siege…

Lifting the server siege…      done.

Transactions:                1789818 hits

Availability:                 100.00 %

Elapsed time:                 180.00 secs

Data transferred:            5264.09 MB

Response time:                  0.10 secs

Transaction rate:            9943.43 trans/sec

Throughput:                    29.24 MB/sec

Concurrency:                  997.06

Successful transactions:     1789818

Failed transactions:               0

Longest transaction:            0.87

Shortest transaction:           0.00

错误率是0

测试客户端B:

** SIEGE 2.69

** Preparing 1000 concurrent users for battle.

The server is now under siege…

Lifting the server siege…      done.

Transactions:                1768585 hits

Availability:                 100.00 %

Elapsed time:                 179.31 secs

Data transferred:            5201.65 MB

Response time:                  0.10 secs

Transaction rate:            9863.28 trans/sec

Throughput:                    29.01 MB/sec

Concurrency:                  998.30

Successful transactions:     1768588

Failed transactions:               0

Longest transaction:            3.10

Shortest transaction:           0.03

错误率是0